
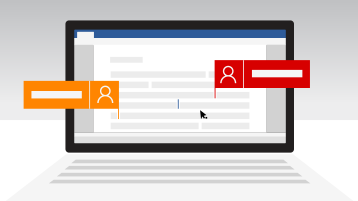
Think about a document you recently worked on with a teammate’s help. How many different versions of that document are still saved on your desktop? How many copies to or from your collaborator are sitting in your Archived emails – or worse, still clogging up your Inbox?
In our recent virtual session, Stop Emailing Documents | The Basics of Document Collaboration & Version Control in Microsoft 365, we highlighted some ways you can streamline that collaboration process. Microsoft Teams interacts seamlessly with SharePoint to link all your documents together across apps, giving you powerful but easy-to-use tools for both collaboration and version control. Using these functions, you can keep your entire team on the same page – and have an easier time finding that one file, too.
We've since re-recorded this session - click here for a more up-to-date version.
Collaborating in Channels using Microsoft Teams
If your organization uses Microsoft Teams, you already have what you need to collaborate. You can share most Microsoft 365 filetypes (Word, Excel, Powerpoint, etc.) directly to group channels, where they’ll be instantly accessible to everyone involved. Since every team & channel in Teams is linked to a directory in your company SharePoint, sharing like this automatically creates a SharePoint version that any of the recipients can edit, even simultaneously!
You have several options for uploading a document to the right directory. The quickest is through the “Attach” icon in the message bar (see below), which is the easiest go-to for uploading a single file. You can also upload a file through the “Files” tab: you might use this option if you were uploading multiple files, or didn’t want to clog the chat with attachments every time. Finally, the reverse is true: uploading your file directly to a linked SharePoint folder will also make it available on any Channels in Microsoft Teams that are linked to that folder.

Caveat: Individual Chats are similar, but less integrated
A similar thing happens when you share a file to individual Chats (either single- or multi-user). You can still collaborate on the document with anyone who received it, but the file isn’t actually on SharePoint: in this case the file is stored in your OneDrive and individually shared with your recipient(s).
This is convenient for short-term collaborations or individual edits, but it’s a temporary solution: files in a colleague’s OneDrive are “at their mercy,” so to speak, so if your colleague deletes the file (or leaves your organization!), it won’t be accessible to you or anyone else.
To avoid this, we recommend copying these files to a non-Chat location once they’re ready for broader use. Always give your documents a place to live in SharePoint as a best practice, and you won’t have to worry about where to find them! Remember: having your collaborative documents backed up and accessible to all who need them is the end goal, so maintaining consistency here is important.
Methods to edit & review SharePoint files
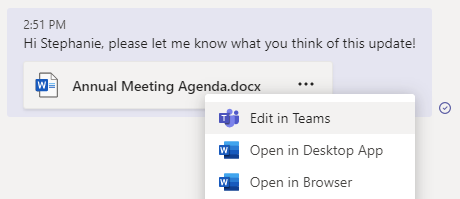
Once the file is uploaded, you have several options to access it through Teams: “Edit in Teams”, “Open in Desktop App”, and “Open in Browser.” Each method is ideal for a certain circumstance, so we’ll try to give some insight into how each one functions best.
Teams
By default, clicking the file will open it directly in Teams.
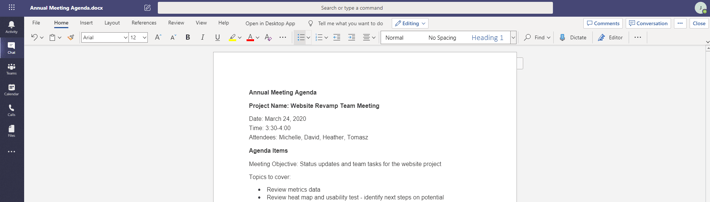
Editing in Teams is an easy way to quickly view or make small changes to a document, but it doesn’t have full functionality, and you can’t use Teams for other things at the same time. For example, if you're on a Teams call to discuss the latest blog post (about how people should Stop Emailing Documents, for instance), opening a collaborative file directly in Teams could compete with your video call controls, chat window, and any other messages that come in.
You can still switch back and forth, of course, and Teams is pretty good about saving your place in each function (Chat, Teams, Calls, Files). Still, if you’re juggling a lot of information, it might be too much hassle to constantly switch back and forth. In that case, you might want to open the document in a separate program, like the browser or desktop app.
Browser
Selecting “Open in Browser” will load the file in a web-based version of the app, within your SharePoint account.
This is great for working on a document while using Teams for other things. Just like the Teams version, the online version will be streamlined for quick & easy review. It also displays certain things, like Tracked Changes (see below) differently. Just like the Teams version, some features may work better for your personal workstyle, but others won’t be as easily accessible.
Still, it’s a good option if you need to spend a bit of time in the file, but don’t want to open yet another desktop app.
Desktop App
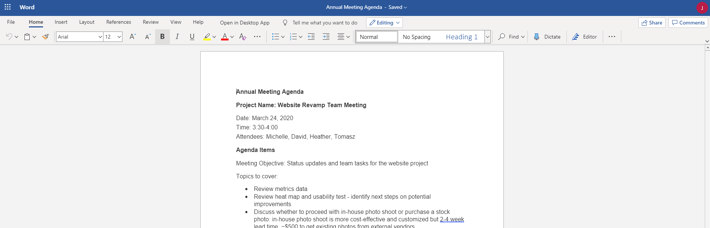
If you need to make a lot of edits, “Open in Desktop App” remains your best bet.
This accesses the same app you’ve likely been using for years, with all of its functionality. The only difference is that – because it lives in SharePoint – multiple users can access the file at once, and everyone’s changes are saved in real time. If you’ve ever been rejected from opening a document because “this file is being accessed by another user,” we know you’ll appreciate that.
-
Again, each of these options gives the same end result: multiple users can collaborate at once, and all changes are saved automatically. You’re still doing the same work, in the same programs, but now Teams and SharePoint ensure your files are up-to-date and easier than ever to access. No more remembering to download the right copy from your email, or double-checking which edits have been made.
Advanced Collaboration: Methods of Editing
Microsoft 365 offers several methods to collaborate within a document, and it’s important to know which methods are suited to which team dynamic. If half a dozen people have access, you may find that “free-for-all” collaboration becomes too confusing or unproductive. On the reverse, asking “permission” to fix a typo or update a data point seems downright tedious.
It’s important to take a bit of time at the start of a project to consider what you need the team’s edits/comments to accomplish. Should one person “take point” on editing the file, while everyone else contributes through the Comments function? Does the team need to stay flexible? Or will your dynamic fall somewhere in the middle?
Whatever your needs, be prescriptive to your team about how to engage with files: making expectations clear at the start often saves plenty of headache down the road.
Real-time edits
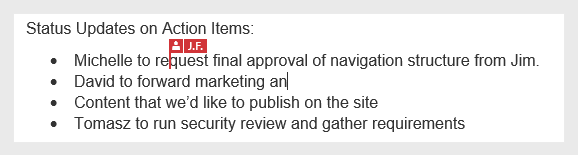
Real-Time editing is often the default for shared documents: anyone with access can freely edit, add, or delete content within the file. While you're viewing the file, other active users will show up as a cursor with their username flagged above (see image).
Best for small or close-knit teams, this allows collaborators to work quickly and autonomously by changing whatever they need to change. If you have access, you can edit it like you’ve always owned it. And – like we said before – multiple people can work together in real time.
This method has a few drawbacks: edits aren’t flagged individually, so it’s harder to track what each person is contributing. You’ll just see one finalized document (and occasionally another user’s cursor), with no forum for discussion or proposed changes. With multiple collaborators, edits might get lost or overlooked in the shuffle. And even though changes are still logged and reversible – see the section below on Version Control – it can be hard to keep track of rapid-fire changes.
Comments
Many Microsoft 365 applications feature another collaboration option: Comments.
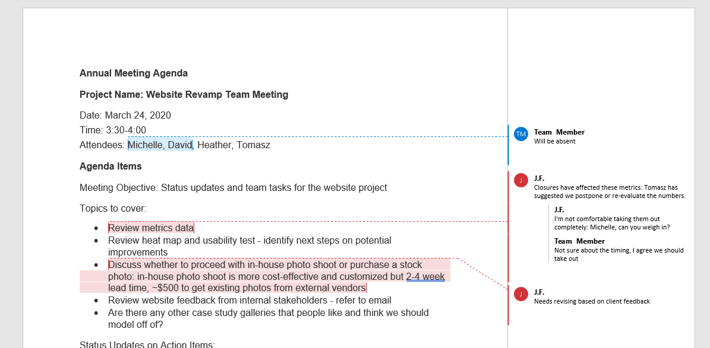
Comments can be found in an app’s “Review” tab, and they let you easily highlight & discuss certain sections of a document with colleagues. With this method, numerous users can contribute their thoughts or critiques to a file without making potentially-disruptive edits to the source material.
You might use this method when you’re about to send out a public-facing document and want several team leads to offer their opinions. Or maybe you’re working on a document and you know something has to change, but you’re not sure how – you can comment on your own sections, asking others to chime in.
Another example: here at Mytech, Nate & Stephanie will often use the Comments feature to maintain one person’s voice in the document itself – the creator/owner of the file will make the actual edits, and the collaborator will just chime in with comments wherever it makes sense. If Stephanie wrote the piece, she can incorporate Nate’s ideas without feeling like her content or tone has been pulled out from under her.
As we’ve said before, there’s no one method that will fit everything you need to do – and we frequently use both methods in the same document! But it’s a good idea to discuss with your team how each function will be used. That way, you can prevent real-time edits like “[INSERT FINAL POINT / A GOOD STATISTIC???], or fifteen Comments saying “use comma instead of semicolon,” “they’re not their,” and “it’s spelled with a C’”.
Track Changes – Word only
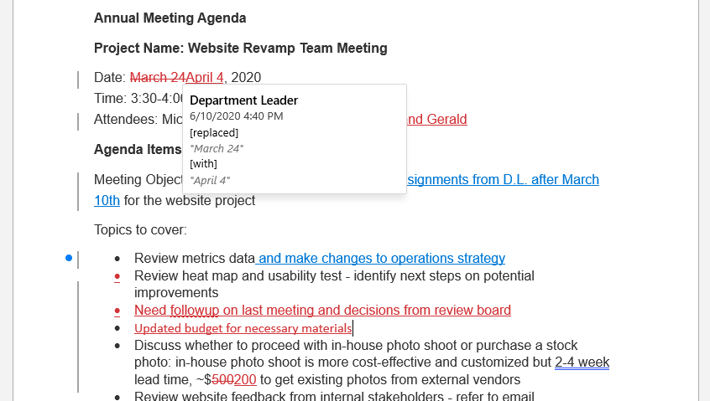
Finally, Microsoft Word boasts a much more granular editing tool: Track Changes. Also accessible through the Review tab, it logs every edit made as a Change. You can adjust how those changes display in the Markup dropdown – in the example below, All Markup displays all changes as colored “proofreader” notes. Different users' edits will also reflect as different colors, showing you who's changing what at a glance.
We could write entire articles just about Track Changes: it’s a powerful tool with plenty of applications! But at its core, Track Changes acts as a sort of “mini version control” – a way to isolate each contribution and review it side-by-side with the old version. This method often combines the best of the other methods: the easily-integrated edits of real-time editing, and the easily-tracked records of Comments.
For example: you might need to write an announcement for your clients, and you know several colleagues will need to contribute key info. Designating yourself as “in charge” of the document, and enabling Track Changes, would allow you to see everybody’s contributions & edits while maintaining control over what goes into the final product. If a change is good, you can Accept it and move on…and if something doesn’t fit, you can easily Reject it.
Of course, there are trade-offs here, too. If there are significant changes to a section, loads of tiny edits, or edits made inside another person’s edits, the record can start to tie itself in knots. If multiple people have to make heavy edits to a document, it might be prudent to stagger the changes, or determine an “order of operations” for who contributes at what stage.
Finally, a small proofreader’s addendum, given from years of personal experience: Track Changes often plays havoc with the spaces between words. Any time you finish Accepting a round of changes, we definitely advise going back over the section to confirm spaces aren’t missing or doubled.
But you were going to make a final proofreading pass anyway, weren’t you?
Advanced Collaboration: Version Control
SharePoint automatically saves all edits made to a document. For some, that may seem more of a hindrance than a benefit, but it offers you the crucial chance to retain everything that has ever been altered in the file. You no longer have a need for multiple nearly-identical files in your system that read “MayCalendar_v4_update_JS_edit_FinalFIXED.xlsx”.
But if your process relies on that kind of system, automatic saves will take some getting used to. SharePoint is a powerful tool, but learning where it does best (and what its drawbacks are) is the only way you can truly get the most out of it.
Version history
Unlike other functions we’ve discussed here, Version history isn’t directly accessible in Teams. You’ll have to find it in SharePoint, where the file is stored and managed. From the “breadcrumbs” dropdown next to a file, you can click “Version history” to see all editions of the document.
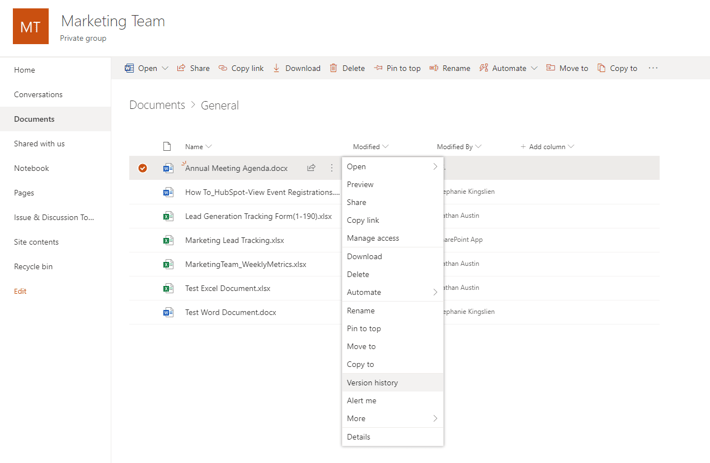
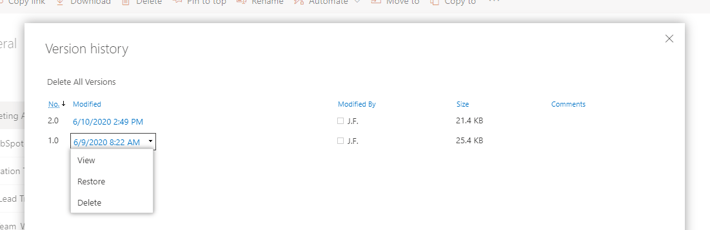
This will display a list of document versions, in descending order, starting with the current version. Clicking a blue date & time will display the version from that date. You can also Restore or Delete that version from its dropdown menu (“View” is actually a misnomer, and only shows file data. Click the blue date & time to actually view that version).
Viewing an older version can help you recall bits and pieces of an old draft. Imagine there was a single paragraph you really liked in last week’s original, and it could fit the current version with a few tweaks. This method would let you review the old version (and do a quick Copy & Paste) without having to make drastic edits or recreate the paragraph from scratch.
Restoring an older version of a document is a useful tool. It can help you get back to work quickly if your recent edits were made with flawed information, or if you experience a big “back to the drawing board” moment. It will likely also see use for fixing accidents – say, if a colleague unwittingly deletes the entire Fiscal Year Summary table and misses their window to Undo it.
Deleting an old version of a document might seem strange if the point of all this is to remember all versions. But it could be an option worth knowing, if that version contains inaccurate data or – for whatever reason – contains sensitive or inappropriate information you want to dispose of permanently.
Publishing
When you’re done collaborating and want to finalize the document, it’s important to make sure further changes can’t sneak in unannounced. Depending on your needs for the file, this can be accomplished on or off SharePoint.
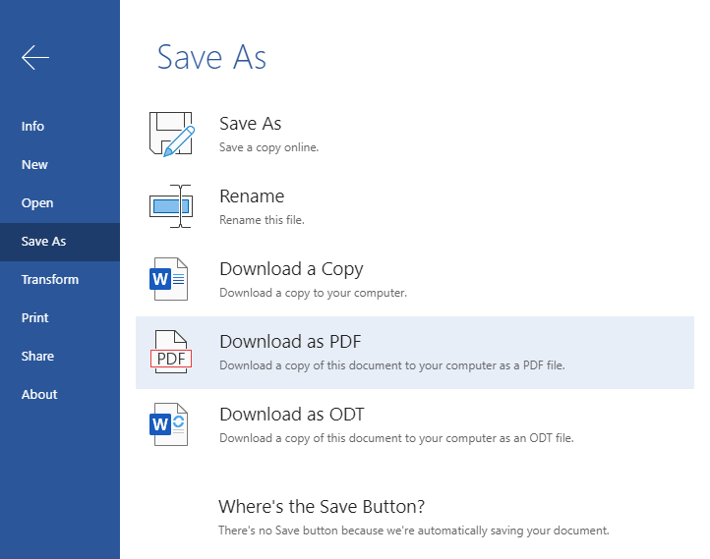
By downloading the document to your computer, either as a pdf or its original file type, you create a separate version of the file without those editing permissions. If you only need the document to share with a few people or use yourself, this is a simple way to prevent further revisions. Since SharePoint files are often difficult to send to users outside your organization, downloading your own copy is still a good method for external sharing.
If the document needs to remain visible to a larger audience within your organization – maybe as an internal policy document – you can change the file’s permissions while keeping it on SharePoint. This can be done with “Manage Access” from the file’s dropdown menu. Here, you can designate certain collaborators as allowed to edit, while restricting others to simply viewing the document. You can also move the file to a different folder, effectively “publishing” it by removing it from other users’ access.
Once work on a document is “finished,” you may be tempted to call it a day and not require any further protocols for editing. But we strongly encourage you to develop a strategy for publishing and finalizing key documents. Where will the document live? Who takes ownership of finished documents? Version Control isn’t just about saving backups: it’s about making sure every change that happens is both expected and tracked. Building the end-stages and publication into your process will help you to be in control of every step of the collaboration process.
Conclusion
Hopefully, this breakdown has given you a bit more to think about when it comes to working together online. Beyond simple chat functions, Microsoft Teams is a powerful connector to an entire range of collaboration options, actions, and effort-saving shortcuts that can help you unlock the full potential of Microsoft 365. If you aren’t already using its full functionality, try out a few steps today to see how it could fit into your process.
Of course, a few tips & tricks certainly won’t solve all of your problems. Collaboration with others can be tricky no matter what system you’re using, but we’re happy to help you manage the technical side of the process more effectively. We’re always eager to Make IT Easy, so if you have any questions, please don’t hesitate to ask.